
- How to Find the Best Spray Paint for Metal - December 3, 2021
- Creative Wood Burning Ideas: To Bring Back Your Inspiration! - November 20, 2021
- Best Iron for Perler Beads Guide: To to Enjoy This Craft Even More! - November 20, 2021
Creative Wood Burning Ideas
If you’re anything like me, you’re probably watching the holidays approach with their typical hastiness while you are still scrambling to find gifts for everyone on your list. Perhaps we should make it easy on ourselves this year and design our own gifts. It will, as the proverb says, “kill two birds with one stone.”
Maybe we really can have it all!
You see, designing and creating our own gifts allows us to gift uniquely personalized items and enjoy a creative outlet at the same time. So, if you’re interested in trying out a new craft, won’t you join me as we delve into the world of wood-burning?
What Is Wood Burning?
In technical terms, this craft is called pyrography. This is a word formed from the Greek words, pur and graphos. Together these words produce the term ‘fire writing,’ which is a poetic way to say wood-burning.
This technique of etching words and pictures onto wooden planks has been around for millennia. Traces of this art form have been found dating back before recorded history. It has also been found in nearly every area of the world, including Africa, South America, Europe, and Asia.
Wood Burning is an art that utilizes wires, metal tips, or any metallic object that can conduct heat to burn shapes, letters, or entire pictures onto pieces of wood. A beautiful thing about this art is that once you have acquired the necessary equipment, it is a very inexpensive hobby.
Ideas to Try
Now that we have learned a little more about this awesome art form let’s look at some fun ways to use it.
Color Block Wall Art
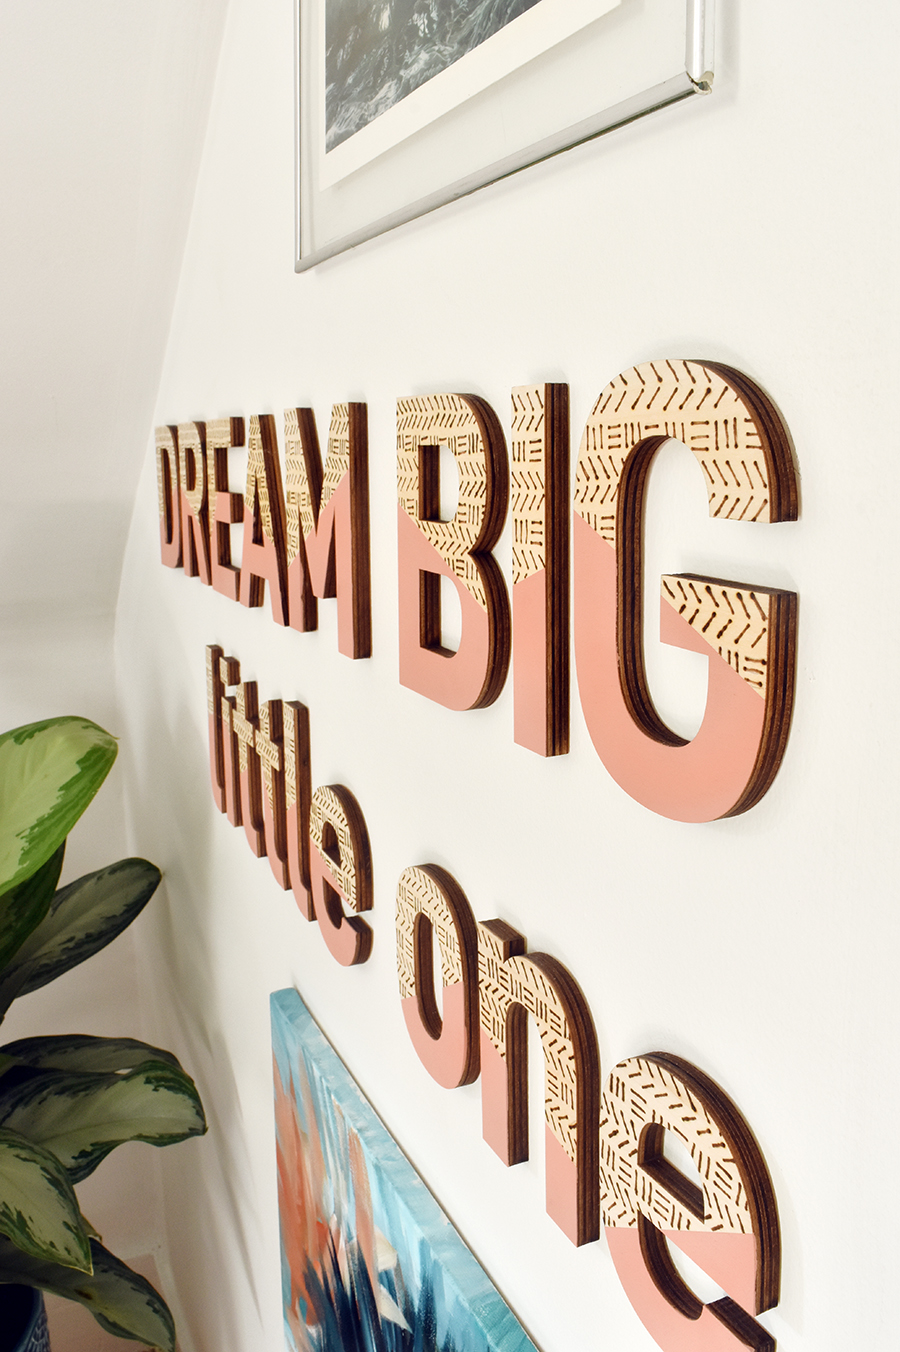
This is a fabulous way to use your wood-burning skills. As a type of project that allows you to express yourself both in word, as well as in color and style, you can’t go wrong. Let’s talk about the supplies you’ll need and then walk through the process so you can decide if this is the sort of project you would like to try.
Supplies
- Acrylic craft paint
- Foam paintbrush
- Painter’s tape
- Pencil
- Woodburning tool
- Wooden letters
Steps
- Use the painter’s tape to tape each letter diagonally. Set the letters in a row so you can make sure the part of the letters that will be painted will look good together.
- Use the foam paintbrush to paint the lower section of the letters.
- Allow the paint to dry. Remove the painter’s tape once it is completely dry.
- Use the pencil to draw a pattern on the upper portion of the letters.
- Heat up your wood-burning tool.
- Test your Woodburning tool on scrap wood.
- Use your Woodburning tool to burn over the pattern you drew with the pencil.
- Use a white eraser to clean the wood of any leftover pencil marks.
- Enjoy your finished project!
Personalized Cutting Board

This project is sure to be a winner when it comes time to do gift-giving these holidays. You can use your Woodburning tool and creativity to personalize these items as much or as little as you please. Let’s discuss what you need for this project:
Supplies
- Cutting board
- Pen
- Pencil
- Woodburning tool
- Your personal design, name, or slogan printed on a piece of paper
Steps
- Place the paper with your design on it upside down on a table (blank side should be showing).
- Rub the entire backside of the design with a pencil.
- Turn the paper over so that the design is facing up and place it on the cutting board.
- Use a pen to trace the design while the paper is resting on the cutting board.
- Lift the paper off the cutting board (you should see a light outline of your design in pencil on the surface of the cutting board).
- Use your Woodburning tool to trace the outline.
Note: This technique can be done on any piece of wood.
Wood Burned Ornaments

This project is perfect when you need a lot of gifts for a group gathering. While this is geared toward the Christmas season, there’s no reason why you couldn’t make a design that suits other holidays or events. Here’s how to make them:
Supplies
- Pencil
- Round stencil
- Wood ornament
- Woodburning tool
Steps
- Use a pencil and a round stencil to trace a circle onto the ornament (this should be set an inch from the ornament’s edge).
- Use a pencil to write in the middle of the circle you just traced.
- Heat up a flow point tip on your Woodburning tool to medium-high.
- Use the heated Woodburning tool to trace the words and the circle you have stenciled onto the ornament.
- Create leaves on the circle by pressing a shading tip around the circle.
- Tie a ribbon or decorative string onto the ornament.
Note: It is recommended that you practice this project on scrap wood before trying it on your ornaments.
Block Coasters

When you need something for a housewarming gift, pull out this project and let your love and creativity flow freely. This is such a versatile project that you can make it for anyone. Let’s look at how to do so.
Supplies
- Pencil
- Ruler
- Woodburning tool
- Wooden coasters
Steps
- Use the pencil and the ruler to draw your chosen design onto the surface of the wooden coasters.
- Use a chisel tip on your Woodburning tool to burn along the penciled lines of your chosen design.
Note: You can add color to your coasters by filling in some of the design with Promarker pens and applying a clear sealant on top.
Growth Chart
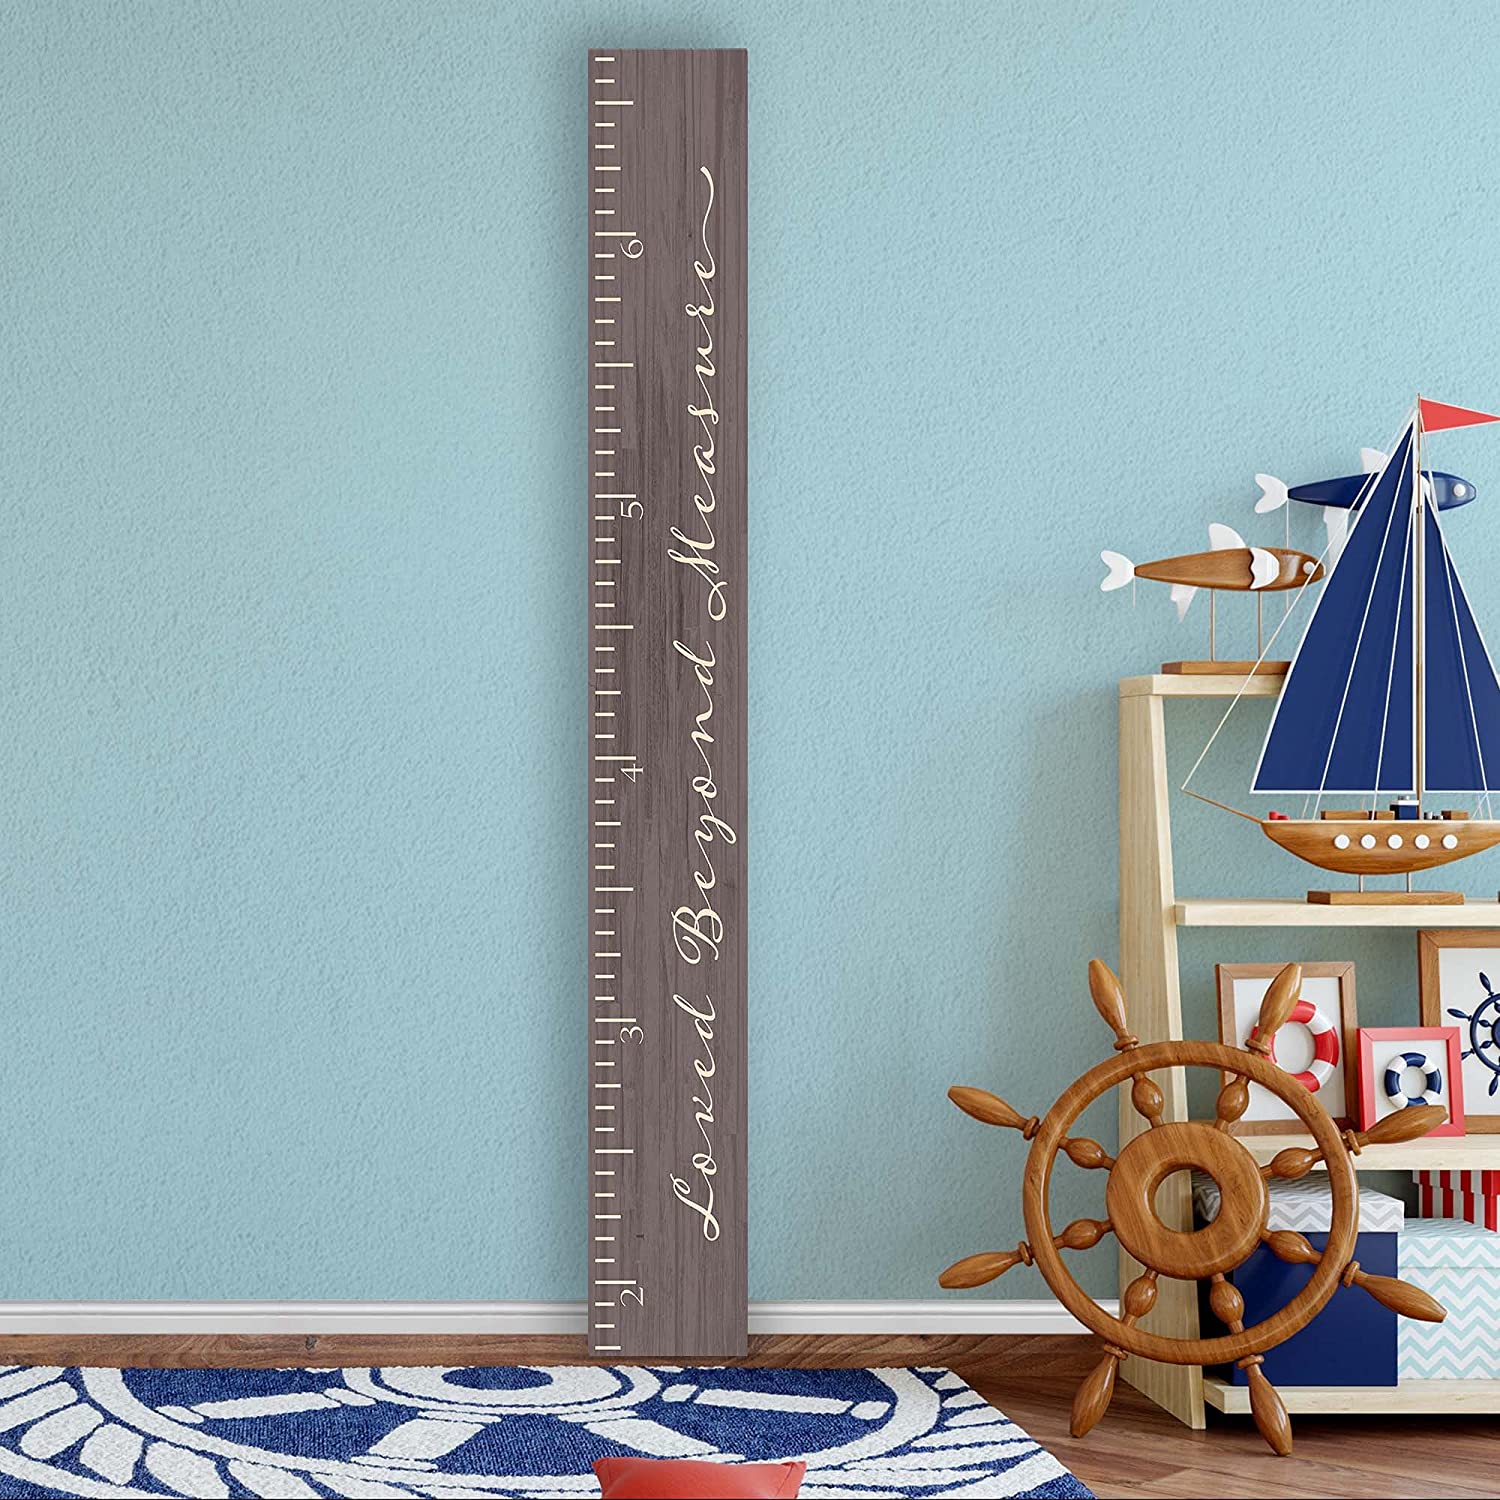
This is such a cute project that you may want to make one for your own kids once you have gifted your loved ones. It may be a little more complicated than some other projects, but it is so worth trying. Let’s give it a go:
Supplies
- Cloth for staining
- Foam brush for staining
- Hanging clip for the back of the chart
- Miter saw
- Pencil
- Piece of lumber (1” wide X 8” long)
- Ruler
- Sandpaper or sander to smooth the sides and edges
- Wood-burning tool
- Wood stain
Steps
- Cut the board to size using the miter saw.
- Use the ruler and the pencil to measure and mark the ruler marks.
- Use the wood-burning tool to burn the outline of the penciled ruler marks.
- Sand the sides and edges lightly.
- Stain the board (test the stain in a small area before applying it to the entire chart).
- Attach the hanging clip to the back of the chart.
- Hang the chart on your wall.
Note: You can apply polyurethane after staining the chart to help protect the wood and the burn marks.
Recommended Wood Burners
If you don’t already own a wood burner, you will need to find one so that you can begin working on your projects. Here are my top three product recommendations:
Hilogaxy Wood Burning Kit
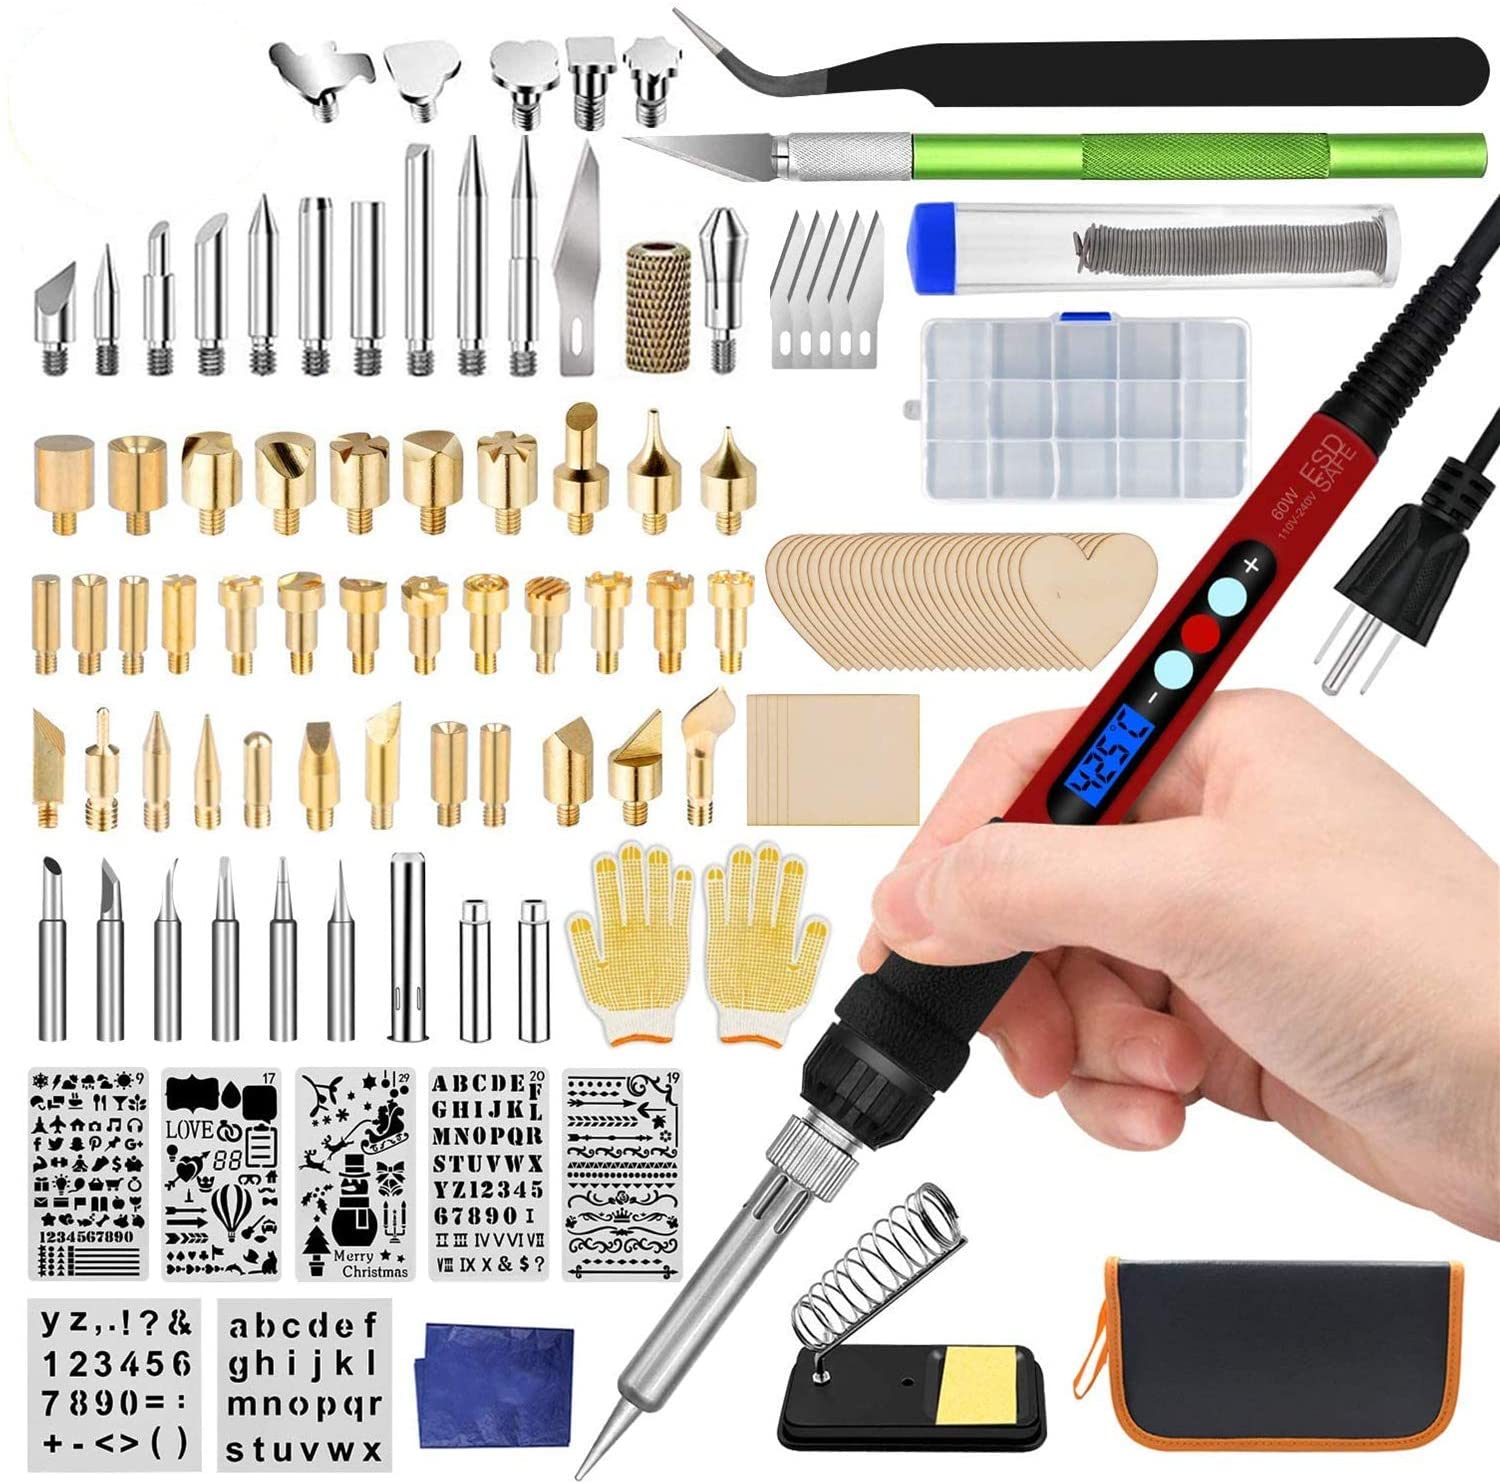
This kit has nearly everything you need to get started with this craft. With 125 items included in the kit, you should not need to purchase anything else.
Pros
- As of the writing of this article, customers have given this kit a 4.1-star rating
- Heats up quickly (15 to 20 seconds)
- Temperature ranges between 356 and 932 degrees Fahrenheit
- The pen includes an LCD screen that displays the temperature
- The pen is designed with a comfortable grip that provides protection from heat
- Comes with a 30-day return policy
- Includes 56 tips
Cons
- Customers have commented that the pen gets very hot and it is difficult to use without the gloves
- Customers have commented that this is a good kit for beginners but not for advanced crafters
Petuol Wood Burning Kit
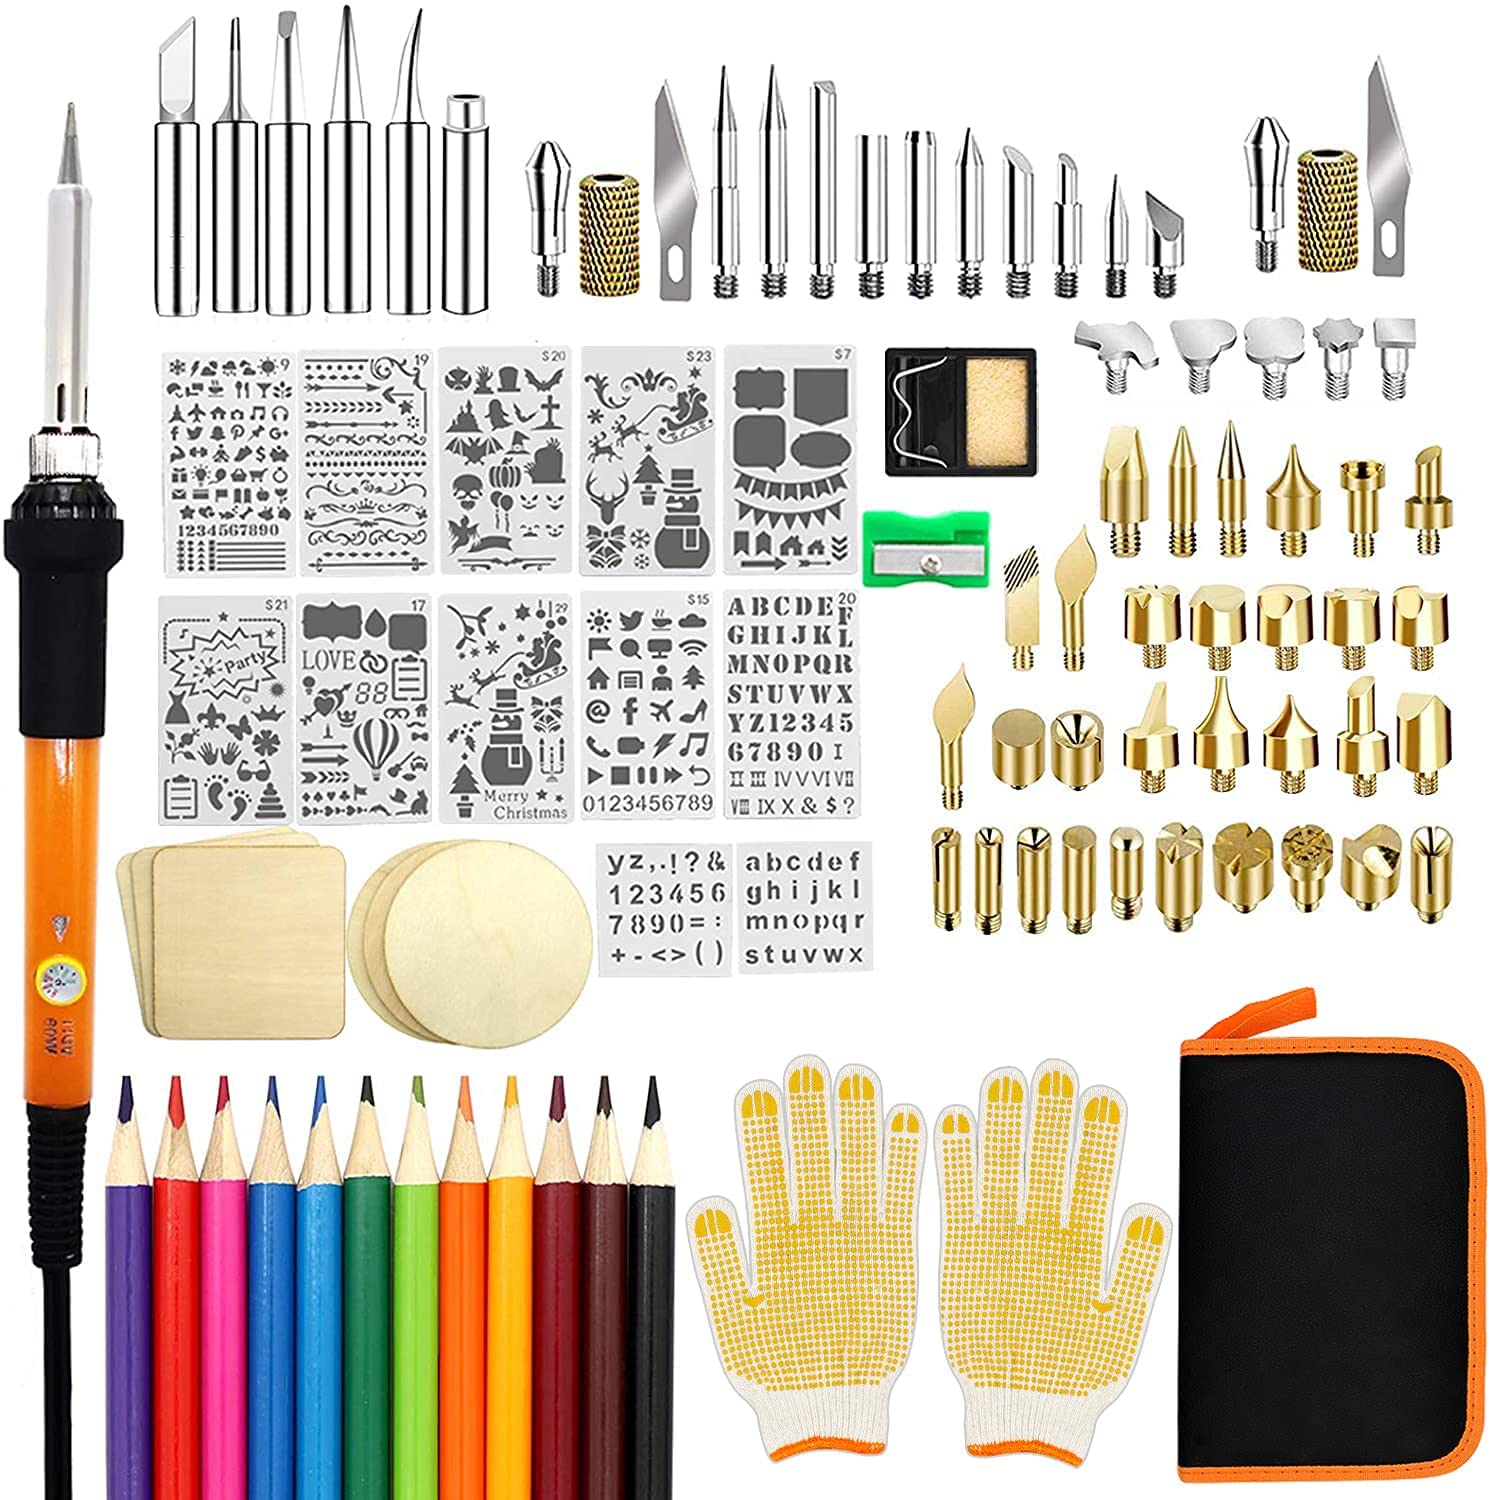
This is a very versatile kit that is great for those just experimenting with pyrography and those who are experienced in this craft.
Pros
- As of the writing of this article, customers have given this kit a 4.3-star rating
- Includes 57 tips
- Comes with a carrying bag
- Includes stencils
Cons
- There are no safety features
- Some customers have commented that the instructions for replacing the tips are difficult to follow
Afantii Wood Burning Tool Set
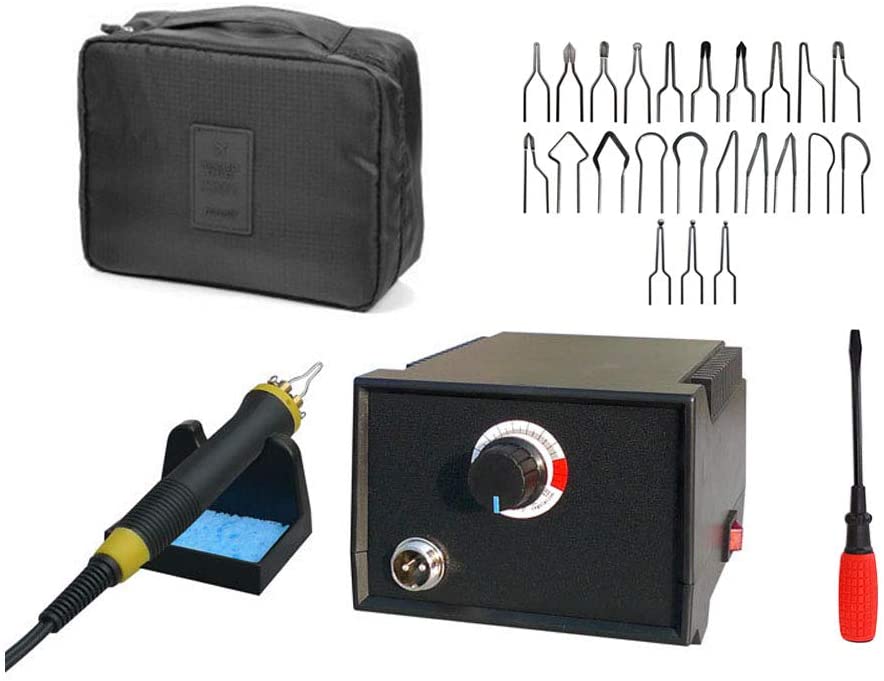
This kit has all the basic pieces you’ll need to begin wood burning. There is nothing fancy about it, but that makes it so much easier to use.
Pros
- As of the writing of this article, customers have given this kit a 4.5-star rating
- Heats and cools within 5 minutes
- Includes a carrying case
- Includes 23 tips
Cons
- Customers have commented that the pen does not keep a consistent temperature
Note: Each of the above recommendations was given because they met the following criteria:
- Customer ratings & reviews – each product had a 4-star rating
- Versatility – each product came with plenty of equipment so that they could complete any type of project
Recommended Equipment for Wood-burning
Along with a wood burner, those who are interested in this art form should purchase the following items:
Fan – you may appreciate something that can keep the air flowing in your workspace so that fumes do not become overwhelming.
Heat-Resistant Dish – a little dish that can hold warm Woodburner tips will come in handy as you remove and exchange them.
Heat-Resistant Gloves – you should at least try to work with a pair of heat-resistant gloves since these will protect your hands from accidental burns. It may feel awkward at first, but take some time to get used to working with them because the trade-off is well worth it.
Pliers – a pair of pliers will help you change out Woodburner tips without getting burnt.
Sandpaper – you should smooth out the wood you are working with before beginning your project. It is recommended that you begin with sandpaper that has a low grit number and move through several different grit numbers to get an adequately smooth work surface.
Wood Sealant – you should definitely apply a finish to your project once it is completed. A sealant will protect the areas that have been burnt and slow down the process of fading. Test the sealant that you have selected before applying it to the entirety of your project; you don’t want to apply something on top of your hard work that will destroy rather than preserve it.
FAQs
Question: What is the Best Type of Wood to Use for Wood-burning?
Answer: When you are selecting a piece of wood to use for your wood-burning projects, you should look for light-colored woods such as beech, birch, or sycamore. The light color of the wood will allow your artwork to show through better. Also, you should never use wood that has been treated, any MDF, or any particleboard since these types of wood will release toxins when they burn.
It is possible to wood burn on painted wood, but it will take longer to go through the paint layers, and it can cause some chemicals to smell up your workspace. If you want a wood-burning project to include color, you can always paint the project after completing the wood-burning process.
Question: Where to Learn the Art of Wood-burning?
Answer: Before you set out to design and create your works of art using wood-burning techniques, you may want to take some time to learn the basics from professionals of this craft. Even if you have some experience with wood-burning, you can better your skills by letting others teach you. Here are a few ways to get started and to learn more about wood-burning:
Blogs
If you can learn new skills by reading and looking at a few basic pictures, then following a blogger may be the quickest and easiest method for you. Here are three bloggers you should consider reading:
Burning with Sharon
Pyrography Made Easy
The Sofa Journal
Books
Another great option for those who enjoy learning via reading is to get a few books. There are a lot of books out there, so don’t get overwhelmed with the large selection. To keep things simple and free of frustration, I have only included three book recommendations. These are highly recommended and should at least get you started.
Art and Craft of Pyrography by Lora S. Irish
Creative Woodburning by Bee Locke
The Wood Burn Book by Rachel Strauss
In-person Classes
For those who learn best with a teacher on hand to help with any issues, look for in-person classes in your city. Here are some ideas of where you might find wood-burning classes:
Community centers
Community colleges
Hobby & craft stores
Online Classes
If you enjoy a classroom setting but cannot currently risk your health, then try an online class. A class that is taught over the internet offers the convenience of a teacher and other classmates while allowing everyone involved to safely social distance. Here are a few places that offer Woodburning classes:
Burn Savvy
Burning with Sharon
Skillshare
Udemy
YouTube
This is perhaps the best of both worlds. YouTube tutorials allow you to learn in the comfort of your home, provide you with audio and visual teaching aids, and are free of cost. Oftentimes, this method also allows you to interact with the YouTube teacher and others who are watching the tutorials. If this is the best method for you to learn wood-burning, check out these YouTubers:
Hegla
Hobby Hoarder
Pyrocrafters
Question: Can Wood-burning Mistakes be Fixed?
Answer: If the mistakes you made while wood-burning a project are small enough, they can be fixed. Simply sand or use a small knife blade to scrape down the area that has the mistake on it.
Concluding Thoughts
I love the idea of creating personalized gifts for the holidays. Who can resist an item that has been specifically made for them? When it comes to these wood-burning ideas, my personal opinion is that wood-burned ornaments are the best. I can picture myself working on these over long weekends and coming up with several designs for each person on my to-gift list.
Hopefully, this guide has given you some inspiration for how to prepare for the upcoming holidays or for any gift-giving time in your life. These are all great opportunities to show your creativity and your love for others.
If you have been inspired to create more gifts this year, you might find our articles on Amigurumi, Tumblers, and baby blankets helpful. Remember, Craft & Stitch is here to help you enjoy more crafting more often.
Research Citations