- Best Glow in the Dark Paint That Will Definitely Amaze You - March 16, 2021
- Best Paint Markers That Will Not Make a Mess - March 16, 2021
- Brother XR3140 Review: Is This Your New Favorite Machine? - March 16, 2021
My first introduction to scrapbooking was through my best friend. She is the queen of encouraging the people she loves with random, “just because” cards and gifts. Her simple, homemade cards started out as handwritten messages in a folded piece of paper with stickers.
Always lots and lots of stickers. Gradually these got more elaborate as she learned more and more about papercrafts. I didn’t even know she had started scrapbooking until the first time I received one from her as a gift.
It was a beautiful celebration of our friendship and I’ll never forget how loved and special it made me feel. That was the moment I decided to learn to make scrapbooks too.
I have received many scrapbooks from my friend through the years. They have marked special occasions from weddings to milestone birthdays. And since that first scrapbook, I have made many scrapbooks to give away as gifts, wanting to make sure others feel as cared for and appreciated as I did.
It is a truly unique gift, combining the time and effort of a handmade gift with the preservation of treasured memories you have shared.
Are you ready to start with the scrapbook ideas for best friend that you must try? Here’s how to get started!
What You’ll Need
Photographs

Fun layouts and embellishments are great, but they are all designed to showcase your photographs. Gather your favorite pictures first so you see what kinds of themes and colors emerge. The number of photos you want to use will determine what size scrapbook will work best, and how many pages you need to plan for.
Since most of us take and store photographs digitally these days, you’ll need to order printed copies of the photos, or print them yourself if you have a quality photo printer.
Memorabilia
Did you save the ticket stub from that concert you went to together? What about a napkin or matchbook cover from your favorite hangout? All best friends have those little things they share, so including physical moments from special times you’ve spent together can really add to your scrapbook.
Maybe it’s a (clean) wrapper from your favorite candy or a coupon from your favorite store. Be creative! Adding memorabilia can make your scrapbook even more personal and nostalgic.
Scrapbook Album

Once you’ve gathered the photos and memorabilia that you want to showcase and preserve, the next step is to find the perfect scrapbook album to put it all in.
The most common size for scrapbook albums is 12 inches by 12 inches square. This gives you a lot of space on each page if you are using a lot of pictures or like more elaborate layouts.
Another common size is 8½ x 11, the size of standard letter paper. Paper in this size is often cheaper, and because of its standard size, you can print things on it using your regular printer. The disadvantage is that many layouts and designs work better on a square page than a rectangular one.
For smaller albums, consider an 8×8 or a 6×6 album. The advantage to an 8×8 is that you will have more space on each page than a 6×6, while still keeping a much smaller feel than a large 12×12 album.
It is rare, however, to find paper in this size, so each page will require cutting and trimming. If you choose a 6×6 album, you can easily trim a standard 12×12 paper into 4 smaller squares and eliminate waste.
The next thing to consider in choosing an album is how it is bound. There are a variety of different types of bindings. Which one is right for your project depends on several factors. Is it important to you to be able to add or remove pages?
Would you prefer to have page protector sleeves bound in the album, allowing you to insert each page? Or perhaps you would rather have the pages themselves bound into the book and decorate them.
Albums, where pages can be added or removed, include post-pound albums and three-ringed albums. These typically also use page protector sleeves.
Hardbound albums have the pages bound just like a hardbound book, and while you can sometimes use perforations to permanently remove pages, there is no way to add additional pages.
There are advantages and disadvantages to each type of album, so consider these factors and choose the album type that best meets your needs. Read more about types of scrapbooking albums.
Cardstock Base Paper

If you choose an album with pre-bound pages, you can skip this step. Otherwise, you’ll need to get a base page to mount everything onto.
Cardstock is the best choice since it is sturdy enough to support most designs and tolerate different types of adhesives. Be sure to purchase the right size paper, or be ready to trim it down to size to fit your album.
Many scrapbookers enjoy purchasing multi-packs of cardstock to give them plenty of options, or even color-coordinated paper sets to give a variety of choices within the same color scheme. Other people prefer to plan out their pages and select individual sheets of cardstock to form the background for each page.
Often solid colors work best for the background page since you can add patterns and textures through embellishment paper. Textured paper is not the best choice for your base paper, since not all adhesives will stick well to the textured surface.
Embellishment Paper

Embellishment paper is a great way to add patterns, accent colors, textures, and other features to your page. The pages can be any size since you will usually cut them to the size and shape that fits your design. These pages are useful for mounting photographs to give them a border, or punching shapes to add accents.
Look for colors and patterns that coordinate well with your base page. These pages can be a lot of fun! Glittery paper, embossed paper, and even tissue paper can all be incorporated into your design. Vellum is another fun addition, adding a translucent overlay to other embellishments or even to the photos themselves.
Often, choosing embellishment paper is one of the most fun parts of designing your scrapbook page, so take your time and enjoy it! Remember to save your scraps, since one project’s trash can easily turn into another project’s treasure!
Photo-Safe Adhesives

Now you need something that sticks the whole thing together – literally. There are so many different options when it comes to scrapbooking adhesives. You’ll probably end up using multiple types on the same layout since they each have advantages for different uses.
Whichever you choose, the key is to make sure they are all acid-free and photo safe. Once you put all this work into your scrapbook, you don’t want the glue you used to damage your work over time.
Most of the time, you want your adhesive to disappear into the layout. Double-sided tape and glue dots are excellent for this. Thin, transparent mounting squares or glue that dries clear are great to use when applying see-through embellishments like lace or vellum.
You can also use adhesives that become part of the design. Foam mounting squares come in different thicknesses to add dimension to your project. You can also use decorative photo corners to attach photographs to your page without applying adhesive directly to the picture.
If you are still uncertain about your layout, consider using repositionable adhesives that let you tack everything down to see how it looks, but then rearrange things if it didn’t turn out quite how you expected.
Want to learn more about adhesives? Read this deep-dive into scrapbooking adhesives!
Cutting Tools

A simple pair of scissors will get you pretty far, but there are so many amazing cutting toys – ahem, tools – available that can save you time and create more intricate designs. Also, they’re a lot of fun!
For straight edges, a paper trimmer is a must. Scissors often leave a sloppy edge, and it’s so easy to accidentally cut crooked. With a paper trimmer, you get a quick, straight edge. Because trimmers have measurement grids on them, you don’t need to mark up your paper with a ruler and pencil.
Be sure to look for a paper trimmer that’s designed to accommodate a 12×12-inch paper with a blade that can handle cardstock thicknesses.
You may also want to experiment with patterned scissors for cutting decorative edges, and specially-shaped punches for creating your own embellishments. Craft knives and other hand-held cutting tools can allow you to cut frames, shapes, and intricate designs. Be sure to use a cutting mat with these tools to protect your work surface.
For more advanced work, you can make your own die-cuts and other designs using an electronic cutting machine, such as the Cricut brand machines. These are a more significant investment, but if you’re passionate about paper crafts, you’ll enjoy all the things you can do with them.
Lettering / Pens

Whether it’s big headings, photo captions, or journaling, you’ll probably want to add some words to the page. There are lots of options for this.
If you have good handwriting skills, you can invest in some beautiful gel pens or calligraphy pens and do the lettering yourself. You may also find stencils helpful for hand-lettering with a special style.
To avoid lettering by hand, look for letter stickers or die cuts that can be mounted to the page. You can also design lettering on a computer, then print and cut to the shape and size that fits your layout.
As always, make sure that you are using acid-free ink, paper, and supplies in order to preserve your photos for posterity.
Stickers

Stickers are fun for all ages! You can find stickers to add color and whimsy to the page, or you can choose elaborate, three-dimensional, and intricately textured stickers for a more dramatic effect. You can usually find a wide range of stickers to go with many different themes.
Stickers are popular because they are easy to use and self-adhesive. Be aware that not all stickers are designed to be used with scrapbooks, though, so always be watching for the magic words: acid-free.
Where to Buy Supplies
Scrapbooking supplies can be found at most craft stores and a wide variety of online retailers.
While most major craft chains and many local craft stores usually have a wide selection of scrapbooking supplies, ordering online gives you an almost unlimited selection. If you are choosing an unusual theme or looking for something specific or unique, shopping online is usually your best bet.
When it comes to prices, shopping online lets you compare and often find a better price. Be aware of additional charges, such as shipping and handling, and make sure you know the seller’s return policy if it turns out you aren’t satisfied with the item.
Large chain craft stores, such as Joann, Michael’s, or Hobby Lobby, are known for sending tons of coupons via email and text message, so it is not always guaranteed that online stores will have the best deals.
The most significant advantage to shopping in person for scrapbooking supplies is color matching and coordinating. When you are trying to coordinate paper and embellishments to go with your photos or overall theme, there’s no virtual replacement for holding everything up next to each other before buying.
Color variations can arise when shopping online, caused by everything from the camera used to photograph the item to the display settings on your device. If you want to be 100% sure that it all goes great together, you’ll need to shop in person.
This is less important, of course, for items like adhesives and cutting tools that will not be visible in your finished project.
Where to Find Ideas
As is the case for so many types of crafts, one of my favorite places to look for ideas and inspiration is Pinterest. It’s like a one-stop site to find the best ideas from many different websites, easily save ideas that I’m considering, and quickly click the links to get more information. Search for “scrapbook best friend” and browse through an endless list of ideas.
You can also check out scrapbooking-specific websites and online magazines, such as Scrapbook.com, Creative Scrapbooker, and Scrapbook and Cards Today.
10 Fantastic Scrapbook Layouts for Best Friends

Best Friends
This layout features just one picture with a number of floral embellishments. The “best friends” lettering is done with textured stickers, while names and dates are handwritten on the smaller rectangles below the picture.
The picture is highlighted with several squares of paper in progressively larger sizes behind it, and there is plenty of whitespaces left on the page. See the original and a complete supply list for this layout.
Harry Potter Marathon
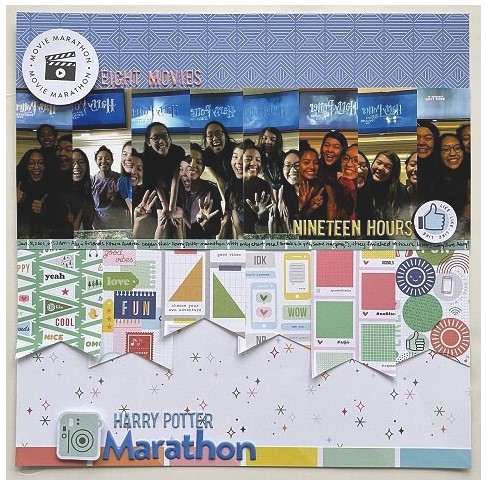
This is a creative use of a succession of multiple similar pictures, with a pastel color theme and simple embellishments. The lettering is done with puffy alphabet stickers that come from the same brand as the paper collection, which helps with color coordination.
The pictures combined with the headings speak for themselves and there is no journaling used to fill in names or dates. This is something that could be added if preferred. See the original and a complete supply list for this layout.
Friends Forever
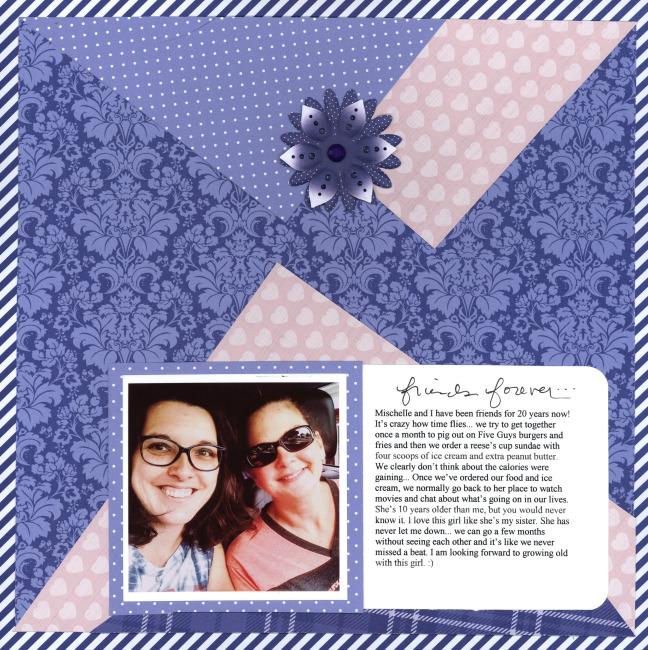
This layout uses asymmetry to its advantage with a very simple design that highlights a single picture and a more significant journaling block. A page like this fits very well as the first or last page in your best friend scrapbook. The paper is chosen to give a quilted effect and one simple embellishment ties the whole layout together.
The majority of the journaling block is typed on a computer and printed, with the heading handwritten for a personal touch. See the original and a complete supply list for this layout.
Worldwide Virtual Crop 2020: Challenge #9
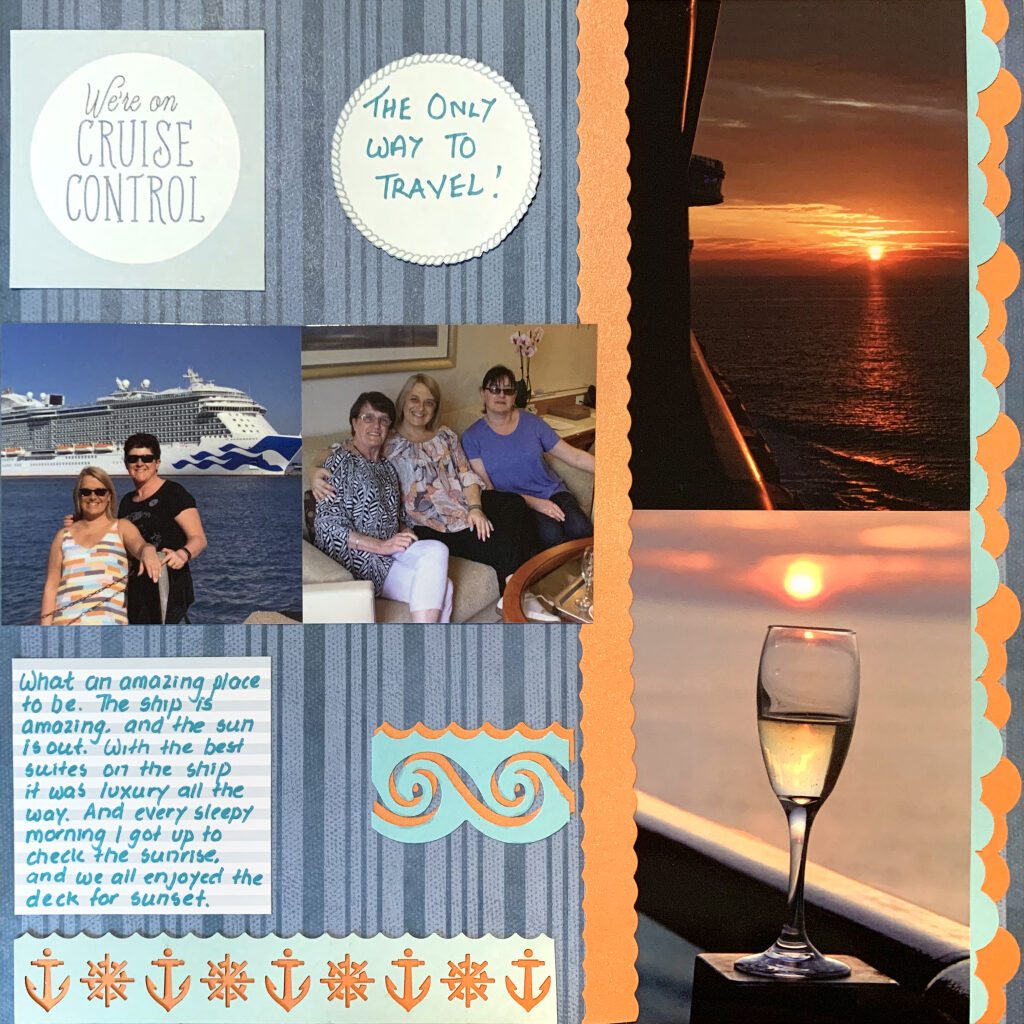
This page highlights a cruise that these friends took together, and features four different pictures. Note that two of the pictures feature people, while the other two highlight particular memories in other ways.
The color scheme of the paper is well-chosen to tie together the colors of the water and of the sunset, and the embellishments have a cheerful but subtle nautical theme. Most of the lettering is handwritten in a complementary color that stands out.
The punched borders give a lovely layered look at the edge of the page to tie all the colors together. See the original and a complete supply list for this layout.
Another Best Friends Layout
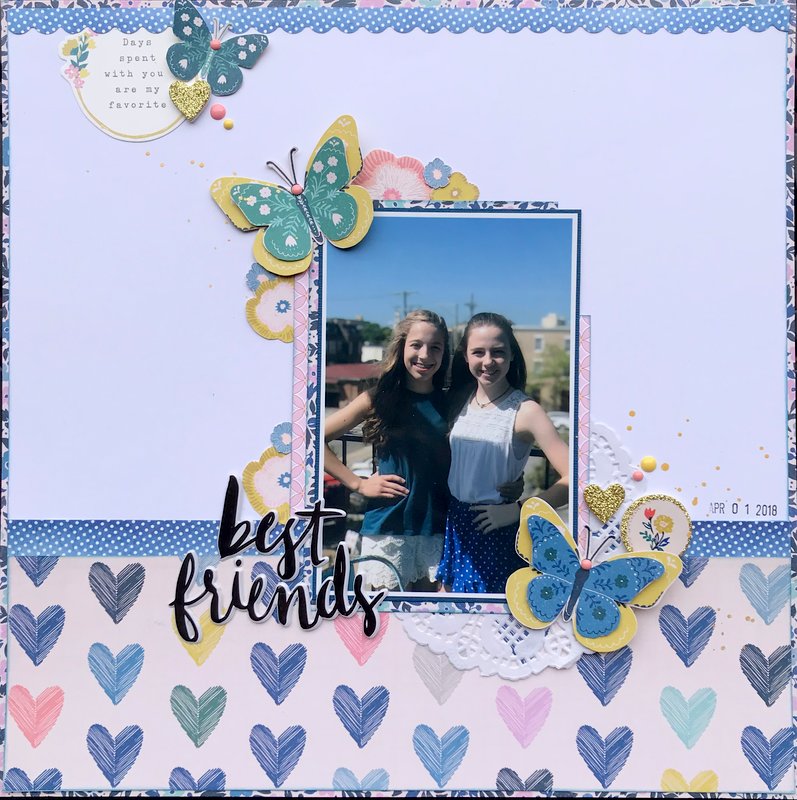
The pastel hearts and butterflies theme on this page brings out the youth and innocence of this pair of best friends. The colors also fit well with the colors in the photograph to give the whole page a very coordinated look. The date on the photo is stamped with what looks like an old library stamp, which is a cute detail.
Because coordinating paper and embellishments like this can be purchased as kits, this simple layout is very easy to pull together. It’s beautiful and beginner-friendly! See the original layout.
Best Friends Scrapbook Layout
The colors used for this page do not directly coordinate with the colors in the photograph, but it works well because they fit the mood and tone. This layout shows a great use of embellishment stickers and decorative tape.
The “splat” stamps and textured “drops” draw the eye to the photo that’s highlighted here. See the original and a video to help you learn to create this layout.
Friends who took a trip together
This layout uses a lot of memorabilia as embellishments to highlight the picture of these friends who took a trip together. The map helps create a background even though the spiral-bound album has a standard color on each page.
Clipping out parts of their travel itinerary and attaching boarding cards and a souvenir patch make this a very simple but effective layout. The lettering is handwritten, but not much journaling is needed because the details are cleverly provided by the memorabilia.
Collage-style with zero whitespaces
Collage-style with zero whitespaces gives this page a very fun and youthful feeling. Colorful pictures are closely trimmed around the subjects without any background. There are no uniform shapes and each element overlaps with those around it.
Quotes cut out of magazines are combined with stickers and handwritten favorites. The effect is to highlight a friendship that is overflowing with good times so that they can barely fit on the page.
Highlight a friendship that has stood the test of time
This simple but effective design features a plain white background with most elements drawn in black pen. Each photo has a drawn frame that is different from the others. Because the idea is to highlight a friendship that has stood the test of time, pictures were chosen from different years and labeled simply with the year they were taken.
A hand-drawn page border coordinates with the hand-drawn photo borders for a cohesive effect. If you prefer not to draw by hand, you can borrow this kind of “timeline” idea but use more traditional borders or photo mounts to suit your theme.
“Mickey ears” theme
The black background of this spiral-bound album creates a dramatic effect for these Disney photos. A few strategic embellishments focus on the “Mickey ears” theme, and lettering is done with white ink to stand out from the black page.
Even though all the photos are in color, the overall effect is a muted, classic, black-and-white feeling that is very different from many other brightly-colored Disney themes.
See originals and more detailed information for layouts 7-10.
Alternative Ideas
Frame It!

Rather than make an entire scrapbook that will end up on a shelf, why not frame your creative endeavors to be hung on a wall or displayed on a shelf or table. Consider creating a one-page scrapbook layout that you can frame!
You’ll either need to keep your design very flat or purchase a frame with a little more depth, such as a shadow box. Simple shadow-box frames are available in standard scrapbook-page sizes, including 12×12 and 8×8.
Go Digital!
If you love the idea of making a scrapbook for your best friend but want to do it a little differently, consider making a digital scrapbook. There are a variety of websites that will help you upload your photos, design your pages, and order a printed copy of your final project.
While digital scrapbooks can’t offer the three-dimensional, handmade quality of a regular scrapbook, you can still do a lot with different layouts, themes, and embellishments. Check out Shutterfly for an easy way to get started!
Digital scrapbooks might be a great solution if you’d like to create the same scrapbook for multiple people, like your best friends group. It also works great if your best friend lives far away since you can have the digitally-created book shipped straight to her.
FAQs
Question: What should I put in my best friend’s scrapbook?
Answer: Use whatever reminds you of your best friend and the memories you’ve shared together. Photos, ticket stubs, newspaper clippings, cards or letters, and other mementos are all great ideas. Every best friend scrapbook will be different because every friendship is different!
Question: Is a scrapbook a good gift idea for my best friend?
Answer: A scrapbook is a great gift idea for any friend! It’s personal, sentimental, and shows that you took time to think about your friend and what makes her special to you. Celebrate your friendship and the moments that matter most with a special gift made just for her.
Question: Where can I find great best friend quotes for my scrapbook?
Answer: A quick internet search will turn up some great quotes about friendship that you can incorporate into your scrapbook. This list is a great one to start with. To make it even more personal, though, consider looking for quotes from someone who matters to both of you.
Maybe you both have the same favorite actor, author, artist, or leader. Search for a quote from that person to make your page that much more meaningful.
Question: How do you make a good gift for your best friend?
Answer: Start by thinking about your best friend. What does she love and what do you love about her? The best gifts come from your heart and celebrate the person receiving them. It might not make sense to anyone else but the two of you, but no one else’s opinion matters.
If you want to give something handmade, consider something that you know how to make that she would use often, remembering your special friendship every time she does.
Final Thoughts
Friends scrapbooks are a truly unique gift. Get creative, collect all your beautiful memories together in a tiny book that will celebrate the friendship and time spent together over the years. It’s sentimental and your best friend will surely be touched and love it!
For more material guides, that might be useful for your scrapbook, check the links below:
- Best Art Markers: What to Look For
- How to Find the Best Drawing Pencils: Our Top 10 Picks!
- Watercolor vs Acrylic: Which Color Is More Durable for Your Art?
